The snapshot program allows for automatic Faraday cup readings and RPM scans for TRIUMF's particle accelerator, based on the beampath and cups chosen. You can also control and save Faraday cup / RPM readings individually. The combined results of all the cup readings are then processed and displayed in tables and graphs to analyze.
| _#_ |
Button |
Description |
When to Use |
| 1 |
Background current |
When selected, the program will first do a scan of normal cup readings, then block beam with source cup and take background readings from all the same cups. This will all be displayed on a table along with the difference giving a more accurate reading.
Note: When using "Laser" or "RIB" options, background current is unselected and vise versa. This is because background readings are not necessary when taking the difference between "Laser ON - Laser OFF" for example.
|
When cups in the beamline have a positive or negative offset, and you are dealing with very low currents (pA) that could affect the transmission. |
| 2 |
RIB ON/OFF |
When selected, a scan will be done with full beam, followed by putting in the source cup and taking the same readings from a second source (like the CSB) to determine how much RIB is in the beam. |
When using a second source (like the CSB) and want to determine the ratio of RIB in the full beam. |
| 3 |
Laser ON/OFF |
When selected, a scan will be done with full beam and laser ON, followed by asking the user to BLOCK the laser (using the shutter or valve) and taking a second scan to determine the difference. |
When using a laser on the target to increase the isotope beam current. |
| 4 |
Include RPM's |
When selected, the first scan with full beam will also include scanning all of the RPM's in between the first and last cups selected. Any additional scans without full beam (like with Laser OFF) will not include the RPM's. |
This feature is auto selected and should be left ON if possible. It is a very helpful feature if the tune needs to be investigated later on, however can be turned off for quick snapshots. |
| 5 |
number of samples per cup |
When taking cup readings, each cup will be scanned this many times within a few seconds and the program will use the average value of those scans. |
Increase this number if the beam is very unstable to insure a more accurate reading. It can take integers from 1 to 600. |
| 6 |
Cup selection |
Use the toggle buttons to select which cups to auto scan. There is still the option to scan individual cups. |
When not wanting to use all Default cups, or wanting to use extra cups not auto selected. |
| 7 |
De-select all cups |
When pressed it toggles all cups to "Omit". |
When only looking to use the individual cup option on next page. |
| 8 |
Continue with selected cups |
After selecting the cups you want to scan, continue to the measure page. |
When everything else is filled out and you are ready to proceed with the snapshot scan. |
| _#_ |
Element |
Description |
Use |
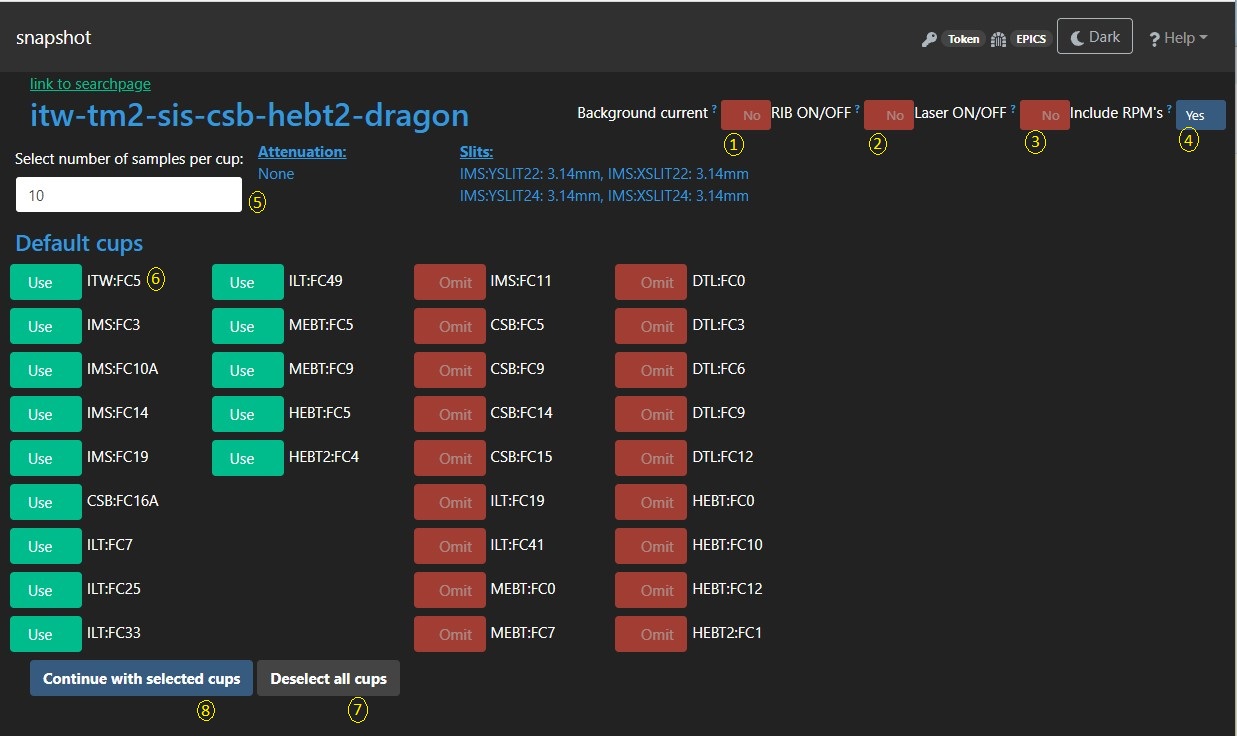
| 1 |
Cup Table |
If any cups were selected in the previous page, you will see a window with a list of cups (and RPM's if selected) that will be scanned. The "Expected snap time" is a close approximation of the time it will take from the start of the scan until all the scans are done (this includes taking multiple scans, ex: Laser ON and Laser OFF) |
Check over the list to make sure they are the devices you want to be scanned. |
| 2 |
Beam ON |
Relates to Background measurements.
green: the program will take "normal" cup readings.
red: the program will put in the source cup and take Background current readings of cups and find the difference. |
Tag can be clicked to cycle green (Beam ON) or red (Beam OFF or in other words -> Background current) |
| 3 |
RIB |
Relates to using another source (like CSB).
green: the program will take "normal" (or RIB ON) cup readings.
red: the program will put in the source cup and take readings of current produced by the second (CSB) source and will find the difference. |
Tag can be clicked to cycle green (RIB ON) or red (RIB OFF) |
| 4 |
Laser |
Relates to using a laser on target.
green: the program will take "normal" (or Laser ON) cup readings.
red: the program ask you to block the laser, then it will do another set of cup "Laser OFF" readings and find the difference. |
Tag can be clicked to cycle green (Laser ON) or red (Laser OFF) |
| 5 |
RPM |
When you see this blue tag, the program will also scan RPM's when scanning with full beam (ie. RPM scans will not be done for Laser OFF, RIB OFF, or background measurements) |
This tag is just an indicator. If it is not there than no RPM scans will be done. |
| 6 |
Open single cup selection |
Opens a new page where you can save individual cups |
See "Single cup selection" |
| _#_ |
Button |
Description |
Use |
| 1 |
Add/Re-do cup |
Clicking this button will bring up a window of all the cups in the beampath to choose from. Once picked it will do another automatic scan of whichever selected cups you have chosen. |
To Re-do the automatic scan process with a new selection (Make sure your selected tags , if any, indicate the type of scan you want to do.) |
| 2 |
Show other table |
Button scrolls between two table types, "The regular table", and the more detailed table with more analyzing tools. The "regular table" is what automatically comes up after a scan is complete. |
scroll the the other style of table if you wish to see all the details of the snapshot using the long detailed table. |
| 3 |
Edit table |
Brings up an [x] to click on and delete any element on the table. Can also show the more detailed table and delete from that one as well. |
If you want to delete a measurement on the table |
| 4 |
quick compare graph page |
Takes the measure data from this current snapshot, and opens it in the display page version where you can checkout what the graphs look like. Put a known measure ID in the text area to compare to a previous snapshot. |
If you want to compare this measure-set to one posted previously (compare to a "good" tune to make sure things still look good) |
| 5 |
Continue to post |
Clicking this will first give the option to make any comments about the snapshot as well as add a savetune, then press the "Post to Elog" button that comes up to post all the comments to the E-log.
Note: Once the snapshot has been posted to the Elog it becomes permanent, you can no longer add or delete FC's from the table. (you are still able to add more or missing comments by using the "add comments" button on the Display page (#8). |
When everything looks good and you wish to post the snap to the Elog |
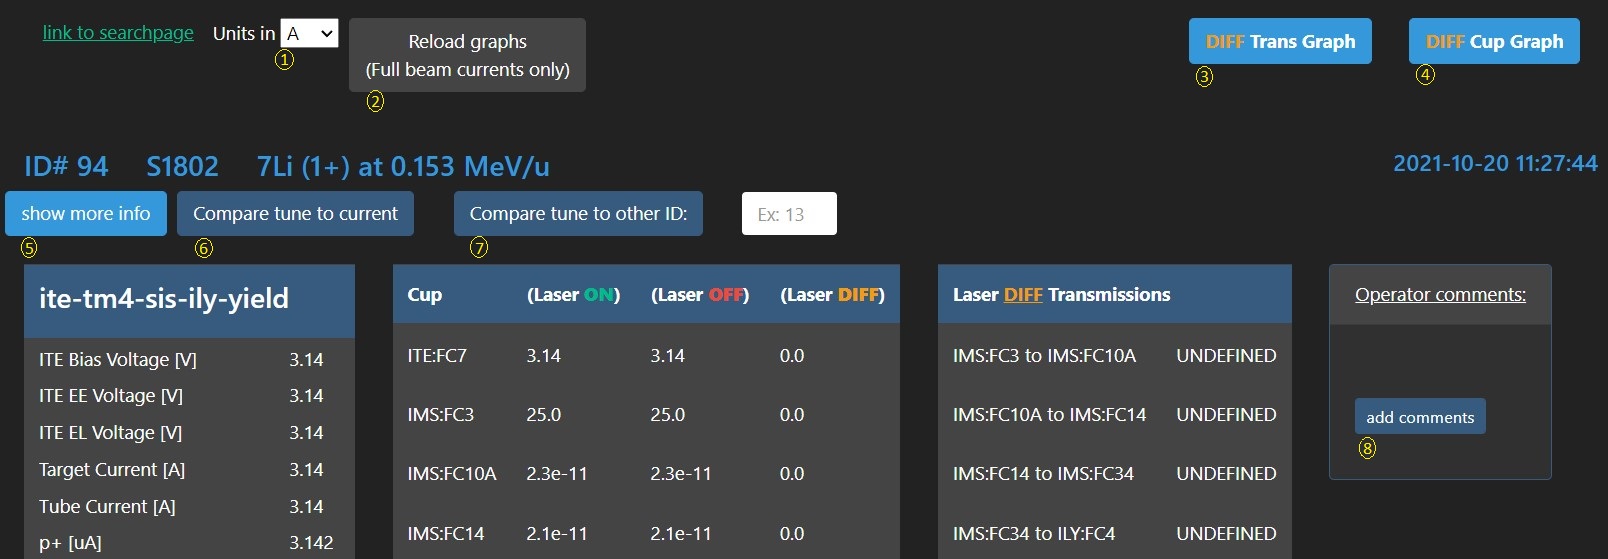
| _#_ |
Button |
Description |
Use |
| 1 |
Units in |
Use the drop-down menu to select which units you want the tables and graphs to be in. |
When you want to display the tables in specific current units. |
| 2 |
Reload graphs |
If the table has a DIFF option, then by default the graphs will use those values for cup current and transmission graphs to compare. If you prefer instead to look at the ON or "regular" current readings and transmission graphs, than this button will re-load the page with those instead.
Note: This button is only shown if there is a DIFF option. |
When you want view the basic snapshot currents and transmissions instead of the calculated difference. |
| 3 |
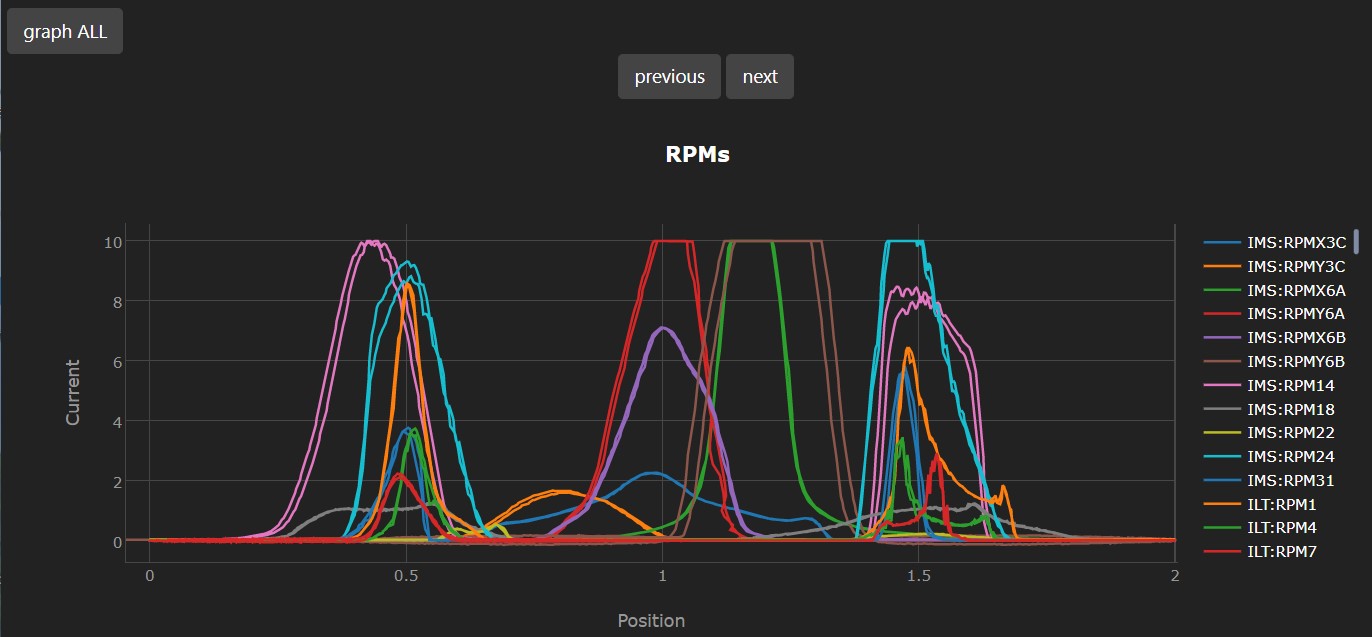
DIFF Trans Graph |
Brings up transmission graphs of all measurements on the page. If there is no DIFF option than it will use the "normal" transmission readings by default. The legend of the graph will show if individual measure ID's are using the DIFF version or not. |
When you want to compare transmissions of the measurements on the display page. |
| 4 |
DIFF Cup Graph |
Brings up a graph of current readings for all measurements on the display page. If there is no DIFF option than it will use the "normal" cup readings by default. The legend of the graph will show if individual measure ID's are using the DIFF version or not. |
When you want to compare cup readings of the measurements on the display page. |
| 5 |
show more info |
By default more simple tables with relevant info are displayed, this button will cycle to tables with more info and more details. |
When you want to know more info about the beampath properties or see all the measurements that were averaged. |
| 6 |
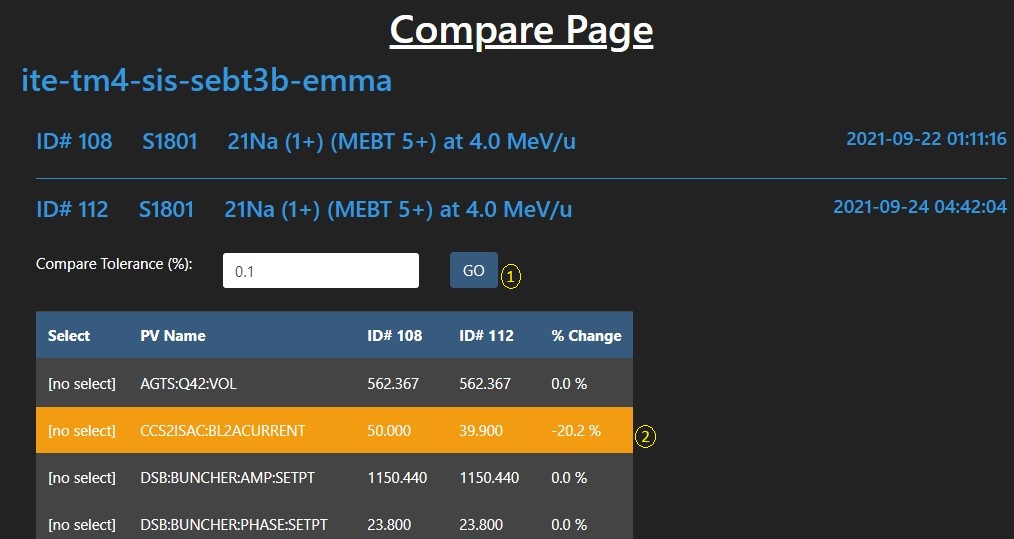
Compare tune to current |
Brings up a new tab that compares the optics and RF of that savetune, with a live update of the current tune |
When you want to see which optics are currently different than when the snap was taken. |
| 7 |
Compare tune to other ID |
Brings up a new tab that compares the optics and RF of that savetune, with another snapshot. You must put the measure ID into the text area and press this button. |
When you want to compare the different savetune's of 2 snapshots. |
| 8 |
add comments |
Any previous made operator comments about this snapshot will be posted above this button. When pressed you have the option at add comments in the text box and press Post. Older comments will all remain and new comments will be posted underneath.
Note: Comments can only be added to permanent measure ID's. (ie: once a snapshot is posted to the Elog). Initial comments are made on the Measure page after clicking "continue to post" (#4) button. |
When you want to add more info in the comments about the snapshot. |
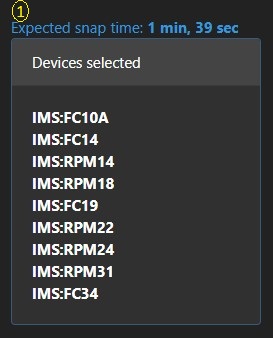
| Graph |
Graph info |
This is an example of one of the graphs that comes up when clicking button 3 or 4 |
The legand on the right of the graph shows the measure ID values that correspond with the graph lines.
Clicking any of the small dash's in the legand will clear that line from the graph, and double clicking the dash will isolate just that line on the graph. |
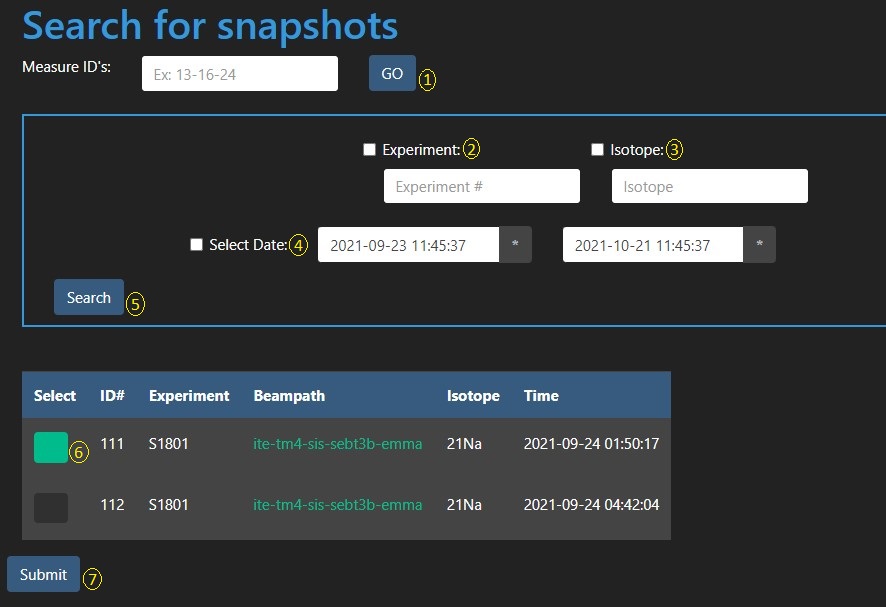
| _#_ |
Button |
Description |
Use |
| 1 |
GO |
A quick way to pull up the display page if you already know one, or multiple measure ID's (separated by a "-"). Put the measure ID's into the text box and click "GO" |
When you know the measure ID numbers to search for. |
| 2 |
Experiment |
Enter the experiment number you are searching for (ex: S1880 ). |
If you only want to bring up a particular experiment snapshots. |
| 3 |
Isotope |
Enter the isotope (with number) you are searching for (ex: 7Li ). |
If you only want to find all snapshots done with this isotope. |
| 4 |
Search Date |
Use the calendars to search for all snapshots taken in a date-range. This auto's to the last 24 hours so operators can see the snaps taken in the last day by just pressing "search". |
If you want to see ALL snaps taken within a date range. |
| 5 |
Search |
After the fields are fill out properly, this executes the search and brings up a table of results (see number 6). |
To see search results. |
| 6 |
Select |
Click the "select portion" of the table to as many snapshots as you would like to bring up in the display page to compare with each other, then click the Submit button (see number 7). If only wanting to view one snapshot than you can also just click the beampath link. |
To compare multiple snapshots with each other on the display page. |
| 7 |
Submit |
Once you have selected the snapshots you wish to view (number 6), click the submit button to open the Display page with those snapshots. |
When you are ready to see that data on the display page from the selected snapshots on the table. |
| Problem |
Explanation |
Possible solutions |
| How do I find a snapshot measurement that has been made? |
Use the search function on the " Search page". |
- If you already know the measure ID than quickest way is to input it at the top and press "GO".
|
| My searches keep coming up empty. |
If you are sure you should be finding something. |
- Make sure the check-box is checked beside all the input you are using.
- Make sure you are using the "beta" or simply "HLA" version (check the URL to know).
|
| Measurement scan fails right away. |
If the error message contains "missing app-data", or the HTML page fails to load all together. |
- Some text field was missing or input incorrectly on the Landing Page.
|
| If the error message contains "check server connection." |
- Make sure you are on a computer that has permission to start this procedure. The "Token" and "EPICS" tokens located in the top right corner of the top navbar should both be green (The website should be the beta version and HLA access granted in EIPCS from the RIB control room).
- If those tokens are already green, than the request might have timed out, and you could simply close the modal and try one more time.
|
| How do I take reading of a cup past experiment borders? |
For safety reasons the program requires a valve or "last cup" to be in place for the program to run. Any cups past experiment border will have to be done using the "Single cup selection" tool that can be accessed using Figure 3 (#6). |
- First use EPICS and check beam current on last cup before experiment to make sure its OK.
- Make sure experiment cup is in the beamline, and open the experiment valve.
- With current on experiment cup, click the "save" button on the single cup selection tool.
|
| Can I add new cup readings to the table? |
Yes, until you have posted to the Elog (making the measurement permanent), you can always add or delete cup readings from the table. |
- For multiple cups you can use the auto scan feature again by clicking the "Add/Re-do cup" button (#1) on the Measure Page. Select all the cups you would like to scan and press continue.
- For single cup readings you can use the Single cup selection tool and press the "save" button.
- Note: If using any operator selections (#2-4) (Beam ON, RIB, Laser), than make sure the tags are the correct colour for the reading you are trying to take.
|
| Can I delete a measurement from the table? |
Yes, until you post to the Elog (making the measurement permanent), you can always add or delete cup readings from the table. |
- On the measure page, click the "Edit table (#3)" button.
- Click the red [x] beside any measurement you would like to delete and the tables will reload automatically.
- To take a closer look at the measurements you are deleting, click the "Show other table" button for the more deteiled table, then the "Edit table" button and delete any from the list.
|
| How to do I make comments before posting to the Elog? |
The comment box is hidden until after you are done your snapshot and ready to post to the Elog. |
- Clicking the " Continue to post (#4)" button will bring up a text field to add comments. This text field can be opened or hidden any time during the snapshot process.
- Once the snapshot is posted to the Elog it becomes permanent and measurements cannot be changed. However further comments can still be added using the " Display page (#8)" button.
|
| How do I view a graph of the snapshot I have just done? |
If the snapshot has not been made permanent yet (ie. posted to the Elog). |
- Click the "quick compare - graph page (#3)" button on the "Measure page" that you are on (with the option of putting other measure ID's in the text area to compare your snap too).
|
| If you want to graph a snapshot measurement that has already been done. |
- Find the snapshot using the search page and bring it up on the "Display page". Then click the "Trans Graph (#3)" button if you want to graph the transmission, or the "Cup Graph (#4)" if you want to graph the cup currents.
|
| What state is the beampath left in after the snapshot scan is finished? |
The "normal" scan starts by putting in all cups it will used, followed by taking out cups that are in the way of the snap. The program saves and takes cups out until the final cup in the list, which will remain in the beamline as well as inserting the first cup on the snap-list. |
- The first cup and last cup on the list chosen will be in the beamline. (plus any cups after the last cup that were already in).
|
| What is the sequence of events the snapshot scan goes through? |
After the "Start measurement" button has been pressed:
- Check to make sure experiment isolation valve is closed (or cup is in for some cases, ex: Yield).
- Checks to see if any Faraday cups upstream of the last cup selected will be blocking the beampath (not including the cups you have chosen) and let you know they will be taken out during the scan.
- All the cups you have selected will be commanded into the beamline.
- Then all the cups in the beamline you have not selected, upstream of your last cup, will be commanded out of the beamline.
- Save the current reading of the first cup.
- Pull out that cup.
- Wait 5 seconds for current to build on the cup.
- Save the current reading on this cup and repeat this until the final cup.
- After saving the final cup, the first cup in the group you selected will be put back into the beamline (leaving the first and last cups in).
- The results will be displayed on the main page.
|
- If RPM scans are ON, than RPM's will be scanned in correct order along with the cups.
- Scans with Laser OFF, RIB OFF, or Beam OFF, will include some kind of blocking the beam or lasers with the routine.
|
| I took 2 readings of a cup but I only see one of them. |
The default table that is created only uses the latest reading of each cup. The other still exists but is not displayed on this table. There are a few special cases where you will see the same cup multiple times (Laser / RIB / Beam -> ON/OFF), and these cases can be selected on the Cup Selection page at the top. |
- To view all every cup reading press the "Show other table (#2)" buton on the Measure page. This brings up a longer more detailed table and will show multiple readings of any cup. Here you can also delete the extra measurement you do not want
- If you want to display multiple readings a single cup for another reason than an option is to use the "Operators choice" button on the "Single cup selection" page and put PV for the cup current.
|
| How to I include "other" PV readings (like COL or SLIT settings, or a vacuum gauge)? |
You can include any extra information in a new table as long as there is an EPICS PV that is active and followed by the HLA servers. |
- Using the "Operators choice" button on the "Single cup selection" page on the Measure page. Just insert the full PV into the text area to include it in the table.
- Note: Anything can be added to the table, but you wont know if the PV will work until you actually try saving it.
|